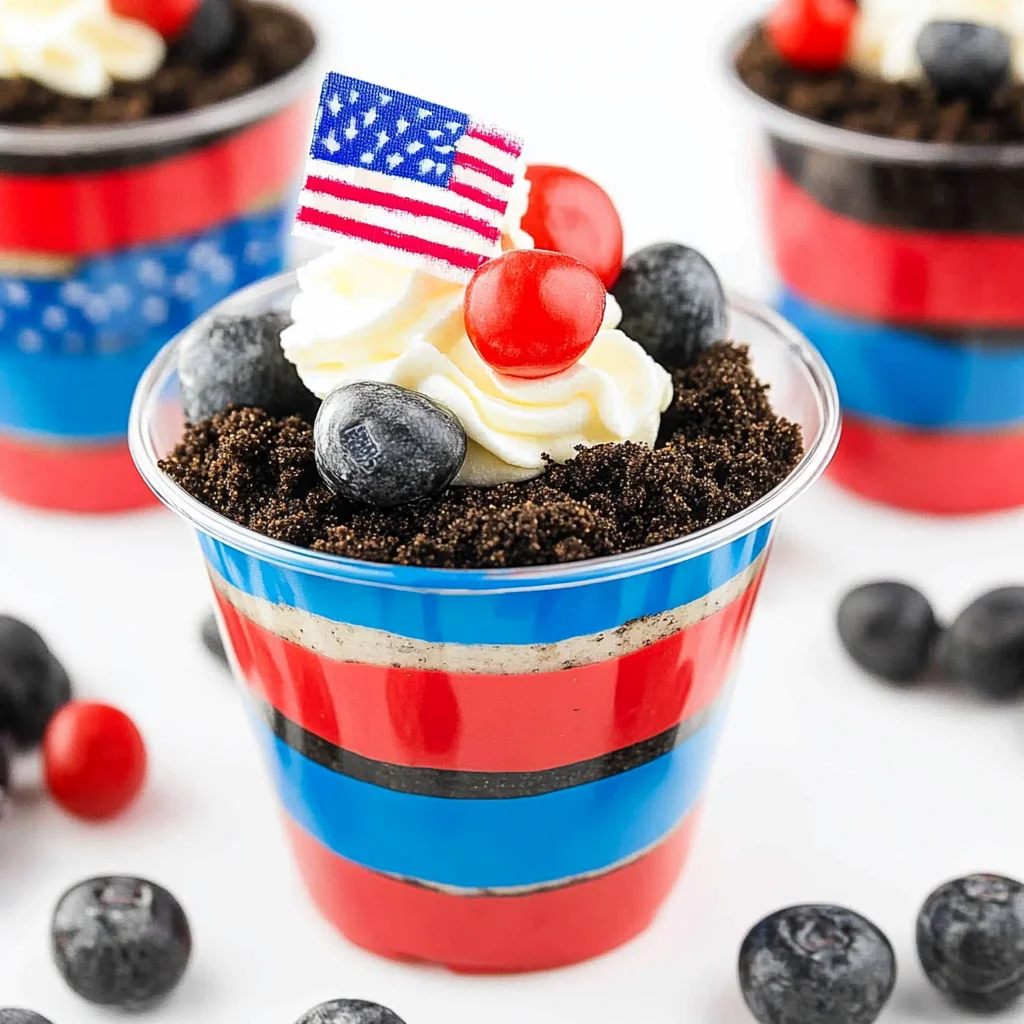
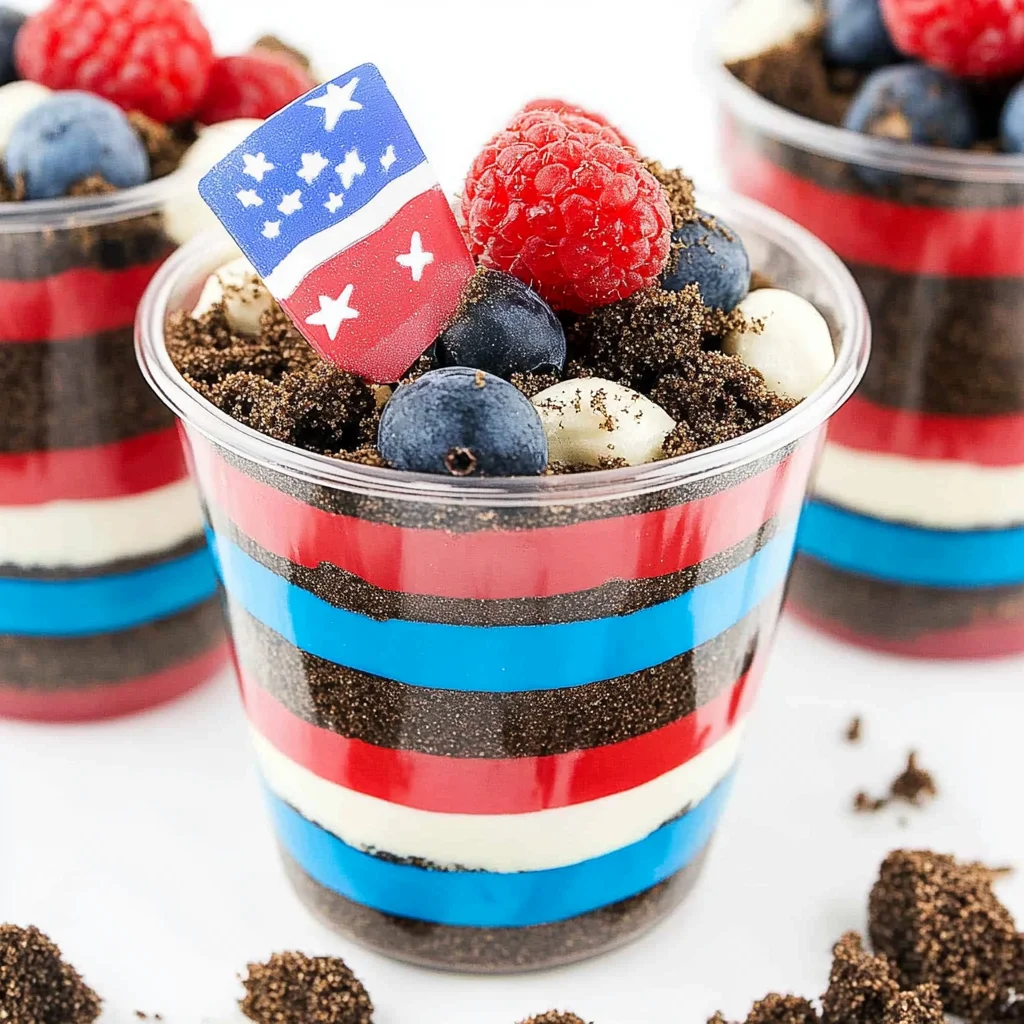
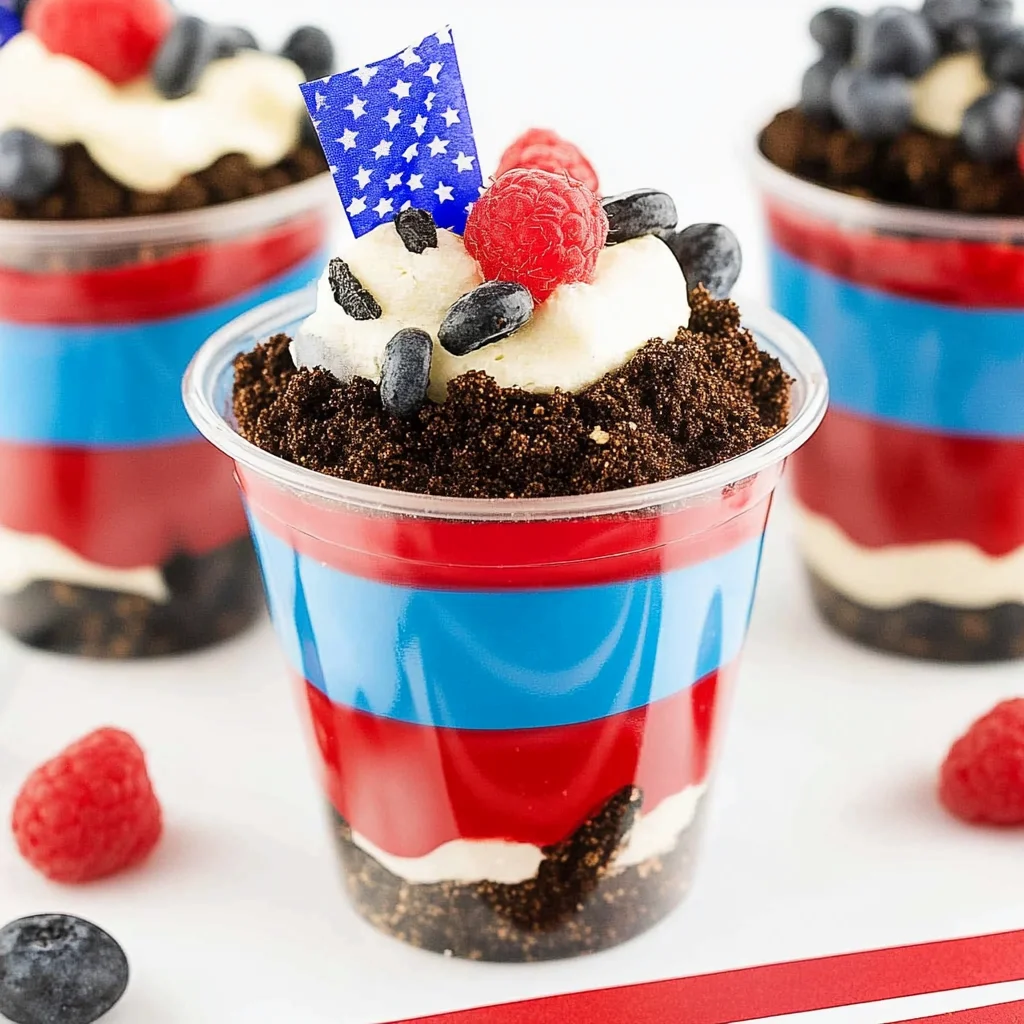
Easy no-bake Red, White and Blue Dirt Cups are a delightful summer dessert perfect for the 4th of July or any festive gathering. These fun and colorful cups not only capture the spirit of the holiday but also delight kids and adults alike with their creamy layers of cheesecake pudding and crushed Oreos. With a quick prep time and minimal ingredients, they stand out as a go-to treat for celebrations and family gatherings.
Jump to:
- Why You’ll Love This Recipe
- Tools and Preparation
- Essential Tools and Equipment
- Importance of Each Tool
- Ingredients
- For the Pudding Layers
- For the Oreo Layers
- For Coloring
- For Garnish
- How to Make Red, White and Blue Dirt Cups
- Step 1: Prepare the Pudding Mixture
- Step 2: Color the Pudding
- Step 3: Assemble Your Dirt Cups
- Step 4: Garnish Your Cups
- How to Serve Red, White and Blue Dirt Cups
- Individual Servings
- Family Style
- Themed Decorations
- Pairing with Beverages
- How to Perfect Red, White and Blue Dirt Cups
- Best Side Dishes for Red, White and Blue Dirt Cups
- Common Mistakes to Avoid
- Storage & Reheating Instructions
- Refrigerator Storage
- Freezing Red, White and Blue Dirt Cups
- Reheating Red, White and Blue Dirt Cups
- Frequently Asked Questions
- What are Red, White and Blue Dirt Cups?
- How long do Red, White and Blue Dirt Cups last?
- Can I customize my Red, White and Blue Dirt Cups?
- Are Red, White and Blue Dirt Cups kid-friendly?
- Can I make these cups ahead of time?
- Final Thoughts
- 📖 Recipe Card
Why You’ll Love This Recipe
- Fun Presentation: The vibrant colors of red, white, and blue make these cups visually appealing, perfect for patriotic holidays.
- No-Bake Convenience: This recipe requires no baking, making it quick and easy to prepare even on busy days.
- Kid-Friendly: Kids will love helping to layer the cups and decorating them with gummy worms!
- Versatile Treat: While ideal for the 4th of July, you can enjoy these dirt cups at birthday parties or summer barbecues.
- Delicious Flavor: The combination of creamy pudding and crunchy Oreos creates a delightful texture that everyone will enjoy.
Tools and Preparation
To create your Red, White and Blue Dirt Cups, you’ll need some essential tools. Having the right equipment makes the preparation smooth and enjoyable.
Essential Tools and Equipment
- Mixing bowls
- Whisk
- Plastic cups
- Measuring spoons
Importance of Each Tool
- Mixing bowls: Ensure you have enough space to mix your pudding without spills.
- Whisk: A whisk helps achieve a smooth consistency in your pudding quickly.
- Plastic cups: These are perfect for serving individual portions while showing off the beautiful layers.
Ingredients
Here’s what you’ll need to make these delightful dirt cups:
For the Pudding Layers
- 2 boxes cheesecake pudding (3.4 ounces each)
- 4 cups milk
For the Oreo Layers
- 19 Oreo cookies (crushed)
For Coloring
- ¼ teaspoon red gel food dye
- ¼ teaspoon blue gel food dye
For Garnish
- 8 red and blue gummy worms
How to Make Red, White and Blue Dirt Cups
Step 1: Prepare the Pudding Mixture
- Place both boxes of pudding in a large mixing bowl.
- Add the milk to the bowl.
- Whisk until the pudding thickens.
Step 2: Color the Pudding
- Divide the thickened pudding into two separate bowls:
- Place 1 cup in one bowl.
- Place 1 ½ cups in another bowl.
- Add blue dye to the first bowl (1 cup) and mix thoroughly.
- Add red dye to the second bowl (1 ½ cups) and stir until evenly colored.
Step 3: Assemble Your Dirt Cups
- Line up your plastic cups for layering.
- Start by adding 1 tablespoon of crushed Oreos to each cup as the base layer.
- Next, add 2 tablespoons of blue pudding on top of the Oreos, spreading evenly.
- Follow with another tablespoon of crushed Oreos as an additional layer.
- Add 3 tablespoons of white pudding over this layer, smoothing it out evenly.
- Use 1 ½ tablespoons of more white pudding as another layer, spread evenly again.
- Finally, top with 4 tablespoons of red pudding as your last color layer.
- Finish off with 2 tablespoons of crushed Oreos on top.
Step 4: Garnish Your Cups
- Top each cup with two gummy worms for decoration.
- Optionally, add a small flag for extra festive flair.
Now you’re ready to serve your delicious Red, White and Blue Dirt Cups! Enjoy this fun dessert at your next celebration!
How to Serve Red, White and Blue Dirt Cups
These delightful Red, White and Blue Dirt Cups are a fun and festive treat perfect for any summer gathering. They can be served in various ways to enhance their presentation and enjoyment.
Individual Servings
- Serve each cup in its own clear plastic cup to showcase the layers.
- Use small mason jars for a rustic touch that adds charm.
Family Style
- Arrange multiple cups on a large platter for buffet-style serving.
- Stack the cups in a pyramid for visual appeal at parties.
Themed Decorations
- Add miniature American flags on top of each cup for a patriotic look.
- Use red, white, and blue napkins or plates to complement the dessert.
Pairing with Beverages
- Serve alongside lemonade or iced tea for a refreshing summer combo.
- Offer sparkling water with fresh fruit for a festive drink option.
How to Perfect Red, White and Blue Dirt Cups
Creating the perfect Red, White and Blue Dirt Cups requires attention to detail. Follow these tips to elevate your dessert.
- Use fresh ingredients: Fresh milk helps achieve the best pudding texture.
- Chill before serving: Refrigerate the cups for at least an hour before serving to allow flavors to meld.
- Layer carefully: Take your time when layering pudding and Oreos for beautiful presentation.
- Experiment with toppings: Try adding blueberries or strawberries on top for added flavor and color.
- Customize flavors: Substitute vanilla pudding for cheesecake pudding if desired.
- Make ahead of time: Prepare these dirt cups a day in advance to save time on the event day.
Best Side Dishes for Red, White and Blue Dirt Cups
To complement your Red, White and Blue Dirt Cups, consider serving these tasty side dishes. They pair well with the sweet dessert while maintaining the festive spirit.
- Patriotic Fruit Salad: A mix of strawberries, blueberries, and whipped cream creates a refreshing side.
- Grilled Corn on the Cob: Sweet corn brushed with butter adds a savory contrast to the sweetness of the cups.
- Caprese Skewers: Cherry tomatoes, mozzarella balls, and basil drizzled with balsamic glaze provide a fresh bite.
- Classic Potato Salad: Creamy potato salad balances out the sweetness of desserts with its savory flavor.
- Mini Hot Dogs: Bite-sized hot dogs are easy to grab and eat at summer gatherings alongside sweet treats.
- Veggie Platter with Dip: Fresh vegetables served with ranch dip offer a healthy option that complements any meal.
Common Mistakes to Avoid
Making Red, White and Blue Dirt Cups is fun, but it’s easy to slip up. Here are some common mistakes to watch out for:
- Ignoring Layer Thickness: If you don’t pay attention to the thickness of each layer, your cups may not look as appealing. Aim for even layers for a better presentation.
- Using Regular Food Coloring: Standard food coloring won’t give you the vibrant colors you want. Always use gel food dye for brighter shades that pop.
- Overmixing Pudding: Mixing too vigorously can introduce air bubbles into your pudding. Stir gently until just combined to keep it smooth and creamy.
- Skipping the Chilling Step: If you don’t let the layers set properly, they may blend together. Chill the cups briefly after assembling for better results.
- Not Crushing Oreos Enough: Large chunks of Oreos won’t create that desired dirt effect. Crush them finely to achieve a more authentic dirt cup look.
Storage & Reheating Instructions
Refrigerator Storage
- Store in airtight containers to preserve freshness.
- Keep in the refrigerator for up to 3 days.
Freezing Red, White and Blue Dirt Cups
- You can freeze these cups, but it’s best without gummy worms or toppings.
- Freeze in airtight containers for up to 2 months.
Reheating Red, White and Blue Dirt Cups
- Oven: Not recommended as it may alter the texture and flavor.
- Microwave: Heat on low power for 15-20 seconds if needed, but be cautious not to melt any layers.
- Stovetop: Not applicable; these cups are best served cold.
Frequently Asked Questions
What are Red, White and Blue Dirt Cups?
Red, White and Blue Dirt Cups are no-bake desserts featuring layers of colored pudding and crushed Oreos. They are perfect for celebrating patriotic occasions like the 4th of July!
How long do Red, White and Blue Dirt Cups last?
These delicious cups last about 3 days in the refrigerator if stored properly in an airtight container.
Can I customize my Red, White and Blue Dirt Cups?
Absolutely! You can swap out the flavors of pudding or add different toppings like fruit or whipped cream for variety.
Are Red, White and Blue Dirt Cups kid-friendly?
Yes! This recipe is simple enough for kids to help with under adult supervision. It’s a fun way to get them involved in cooking or baking.
Can I make these cups ahead of time?
Yes! These cups can be made a day in advance. Just store them in the fridge until you’re ready to serve.
Final Thoughts
Red, White and Blue Dirt Cups are an easy yet festive dessert that captures the spirit of summer celebrations. With their vibrant colors and delicious taste, they appeal to both kids and adults alike. Feel free to customize them with different toppings or flavors to make them uniquely yours! Enjoy this delightful treat at your next gathering!
Did You Enjoy Making This Recipe? Please rate this recipe with ⭐⭐⭐⭐⭐ or leave a comment.
📖 Recipe Card
Print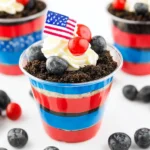
Red, White and Blue Dirt Cups
- Total Time: 0 hours
- Yield: Approximately 6 servings 1x
Description
Celebrate this summer with our easy no-bake Red, White and Blue Dirt Cups! Perfect for the 4th of July or any festive occasion, these vibrant dessert cups are a delightful treat for both kids and adults. Layers of creamy cheesecake pudding combined with crushed Oreos create a fun, textured dessert that is as enjoyable to make as it is to eat. With minimal ingredients and a quick preparation time, these colorful cups not only capture the spirit of patriotism but also promise to be the highlight of your gatherings. Gather your family in the kitchen and enjoy layering these delicious cups while adding your own creative twist!
Ingredients
- 2 boxes cheesecake pudding (3.4 ounces each)
- 4 cups milk
- 19 Oreo cookies (crushed)
- ¼ teaspoon red gel food dye
- ¼ teaspoon blue gel food dye
- 8 gummy worms (red and blue) for garnish
Instructions
- In a large mixing bowl, combine both boxes of cheesecake pudding with the milk. Whisk until thickened.
- Split the pudding into two bowls: color one cup with blue dye and the other 1½ cups with red dye.
- Prepare clear plastic cups for layering. Start with a tablespoon of crushed Oreos at the bottom of each cup.
- Layer two tablespoons of blue pudding over the Oreos, followed by another tablespoon of crushed Oreos.
- Add three tablespoons of white pudding on top, then an additional tablespoon of white pudding.
- Finish with four tablespoons of red pudding and top each cup with two tablespoons of crushed Oreos.
- Garnish with gummy worms.
- Prep Time: 15 minutes
- Cook Time: None
- Category: Dessert
- Method: No-bake
- Cuisine: American
Nutrition
- Serving Size: 1 cup (240g)
- Calories: 340
- Sugar: 28g
- Sodium: 210mg
- Fat: 18g
- Saturated Fat: 9g
- Unsaturated Fat: 8g
- Trans Fat: 0g
- Carbohydrates: 43g
- Fiber: 1g
- Protein: 5g
- Cholesterol: 25mg